Shopify初心者
blocksの使い方が分かりません。
そもそもblocksって何なのって感じです
ECサイトで定番の、画像と商品名と商品説明と値段を表示させ
それを横並びで複数個表示させたりしたいです。できますか?
そんな疑問にお答えします。
疑問を解決に導くのは
エンジニアのSUGAWAYAにお任せ!
エンジニア歴5年以上
Shopify開発経験ありです。
今回は、Shopifyのblocksの使い方をお伝えします。図解や画像、コードを多く用いて解説します。きっとあなたにとって役立つ記事となるでしょう。最後までやってみましょう。
学び
- 図解 blocksとは何なのか?
- liquidHTMLファイル内にHTML作成
- schemaの作成
- liquidファイルをshopifyにアップロード
- 動的にする
- 完成
図解 blocksとは何なのか?
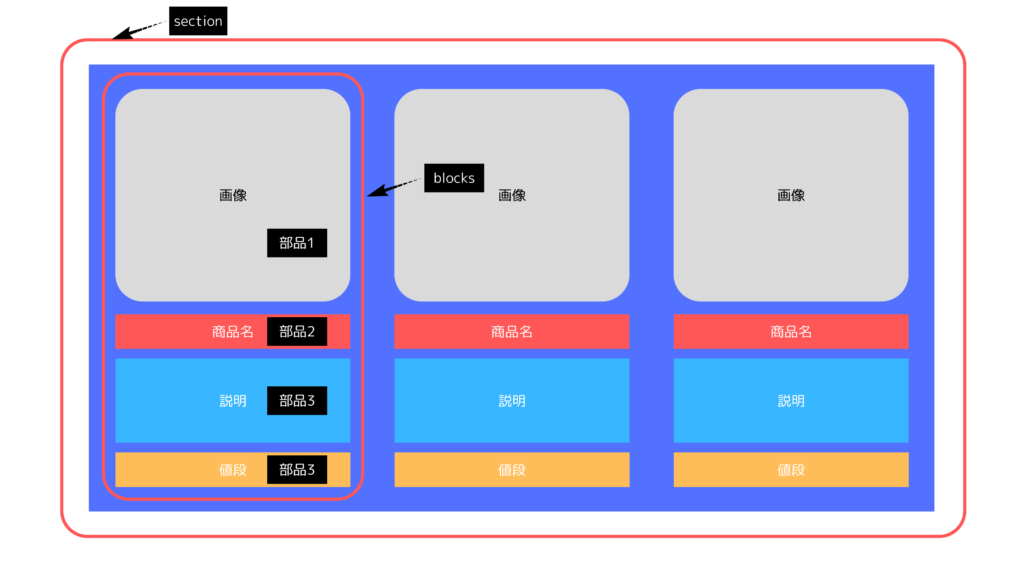
Blocks(ブロック)は、セクション内で追加、削除、再配置ができるコンテンツのモジュールです。簡単に言うと以下の図解のようにsectionの中に複数のBlocksを追加できたり削除できるということです。

liquidHTMLファイル内にHTML作成
今回は、コード内でサンプルイメージを使うのでファイルをアップロードします。
Shopifyに画像をアップロードする方法
まずは、テストストアの管理画面にログインします。
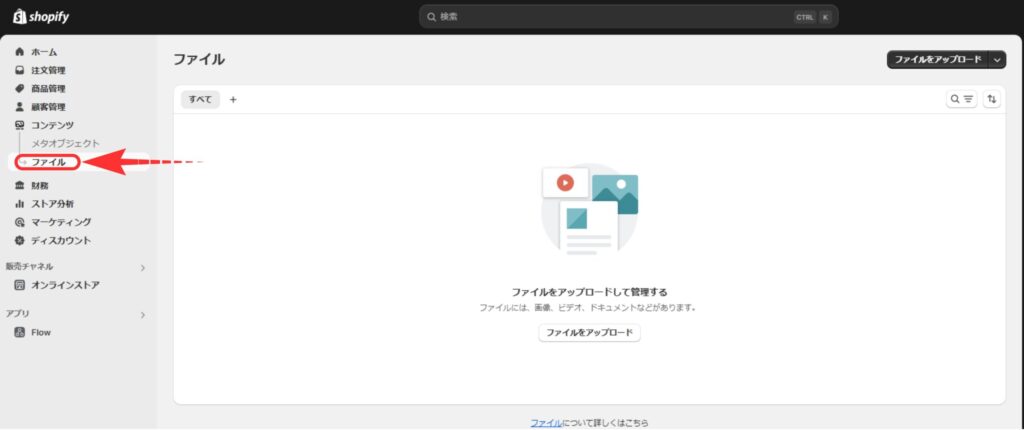
以下の画像の「コンテンツ」をクリックします。

次に、「ファイル」をクリックします。するとアップロード画面になります。

以下の画像を記事からダウンロードしてShopifyにアップロードしてください。
HTML作成
HTMLの作成はローカル環境でやったほうが分かりやすいでしょう。
今回は、Visual Studio Codeのローカル環境を使って作成します。
Visual Studio Codeのローカル環境導入の方法記事はこちら。
参考HTML
<!DOCTYPE html>
<html lang="ja">
<head>
    <meta charset="UTF-8">
    <meta name="viewport" content="width=device-width, initial-scale=1">
    <style>
        .all_wrapper {
            margin: 30px 0px;
            display: flex;
            justify-content:space-around;
            background-color: #5271FF;
            padding: 30px;
        }
        a {
            text-decoration: none;
        }
        .parts_wrapper {
            text-align: center;
        }
        @media (max-width: 990px) {
          .parts_wrapper {
            width: 50%;
            margin: 0 auto;
          }
        }
        .img img{
            width: 100%;
            max-width: 250px;
            border-radius: 12px;
        }
        .name {
            margin-bottom: 10px;
            background-color: #FF5757;
            color: white;
        }
        .description {
            margin-bottom: 10px;
            background-color: #38B6FF;
            color: white;
        }
        .price {
            background-color: #FFBD59;
            color: white;
        }

    </style>
</head>
<body>
    <div class="all_wrapper">
        <a href="#">
        <div class="parts_wrapper">
            <div class="img"><img src="./1.png" alt="img1"></div>
            <div class="name">サンプル商品</div>
            <div class="description">この商品はサンプル商品です。</div>
            <div class="price">980円</div>
        </div>
        </a>
        <a href="#">
        <div class="parts_wrapper">
            <div class="img"><img src="./2.png" alt="img2"></div>
            <div class="name">サンプル商品</div>
            <div class="description">この商品はサンプル商品です。</div>
            <div class="price">1980円</div>
        </div>
        </a>
        <a href="#">
            <div class="parts_wrapper">
                <div class="img"><img src="./3.png" alt="img3"></div>
                <div class="name">サンプル商品</div>
                <div class="description">この商品はサンプル商品です。</div>
                <div class="price">2980円</div>
            </div>
        </a>
    </div>
</body>
</html>
schemaの作成
{% schema %}
  {
    "name": "Section name",
    "settings": [
      {
        "type": "text" ,
        "label": "タイトル",
        "id": "id"
      }
    ] ,
    "blocks": [
      {
        "type": "product",
        "name": "商品設定",
        "settings": [
          {
            "type": "image_picker",
            "id": "img",
            "label": "画像を選択してください"
          },
          {
            "type": "text",
            "id": "name",
            "label": "商品名を入力してください"
          },
          {
            "type": "text",
            "id": "description",
            "label": "商品説明を入力してください"
          },
          {
            "type": "text",
            "id": "price",
            "label": "値段を入力してください",
            "default": "円"
          },
          {
            "type": "text",
            "id": "url",
            "label": "URLを入力してください"
          }
        ]
      }
    ],
    "presets": [
      {
        "name":"test"
      }
    ]
  }
{% endschema %}
上記記述をshopifyにアップロードしてください。
アップロードの方法はこちら。
すると、セクションを追加したときに、詳細設定ができるようになっています↓

liquidファイルをshopifyにアップロード
先ほどのHTMLをschemaの上にコピペしてshopifyにアップロードしてください。
以下のような表示になると思います。

動的にする
まずは、以下のコードをShopifyにアップロードしてみて動きを確かめてください。
{%- style -%}
    .all_wrapper {
        margin: 30px 0px;
        display: flex;
        justify-content:space-around;
        background-color: #5271FF;
        padding: 30px;
    }
    a {
        text-decoration: none;
    }
    .parts_wrapper {
        text-align: center;
    }
    @media (max-width: 990px) {
      .parts_wrapper {
        width: 50%;
        margin: 0 auto;
      }
    }
    .img img{
        width: 100%;
        max-width: 250px;
        border-radius: 12px;
    }
    .name {
        margin-bottom: 10px;
        background-color: #FF5757;
        color: white;
    }
    .description {
        margin-bottom: 10px;
        background-color: #38B6FF;
        color: white;
    }
    .price {
        background-color: #FFBD59;
        color: white;
        border: 1px solid #ddd;
    }
{%- endstyle -%}
<div class="all_wrapper">
    {% for block in section.blocks %}
    <a href="#">
      <div class="parts_wrapper">
          <div class="img"><img src="{{ block.settings.img | img_url: '250x250' }}"></div>
          <div class="name">{{ block.settings.name }}</div>
          <div class="description">{{ block.settings.description }}</div>
          <div class="price">{{ block.settings.price }}</div>
      </div>
    </a>
    {% endfor %}
</div>
{% schema %}
  {
    "name": "Section name",
    "settings": [
      {
        "type": "text" ,
        "label": "タイトル",
        "id": "id"
      }
    ] ,
    "blocks": [
      {
        "type": "product",
        "name": "商品設定",
        "settings": [
          {
            "type": "image_picker",
            "id": "img",
            "label": "画像を選択してください"
          },
          {
            "type": "text",
            "id": "name",
            "label": "商品名を入力してください"
          },
          {
            "type": "text",
            "id": "description",
            "label": "商品説明を入力してください"
          },
          {
            "type": "text",
            "id": "price",
            "label": "値段を入力してください",
            "default": "円"
          },
          {
            "type": "text",
            "id": "url",
            "label": "URLを入力してください"
          }
        ]
      }
    ],
    "presets": [
      {
        "name":"test"
      }
    ]
  }
{% endschema %}
すると、以下の画像のように設定できるようになっていますので、ご自分でアップロードした画像と、商品名などを入力して保存し完成です。
まとめ
この記事で分からないことがありましたら、お問い合わせページよりお問い合わせください。
以前の記事で解説している知識が欠如していて分からない場合も考えられますのでこちらから学びを深めましょう。
今回は以上です!


